Monday, June 25, 2012

DIY PROJECT #8: THE STUDDED CHARM BRACELET


While digging through a basket of vintage earrings at an antique mall in Innisfil, Ontario, I can across these beauts: 


An antique telephone, an anchor, a sailboat, and (what I thought was a wishbone) cowboy spurs. I immediately bought them thinking "these charms would make cute bracelets!". 


Cute, indeed. 


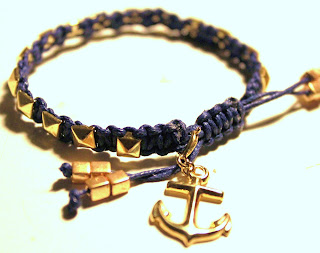
I like how this one is casual. Good for those nautical outfits in the summer. Easy to layer for arm parties. It's an adjustable macrame bracelet, which I decided to stud in order to add more pizzazz. It's super easy to make, and takes about 45 minutes if you've never made one of these before. The great thing is that if you don't want a charm on it, it's easily removed because it's attached with a lobster clasp. 


So what do you need?


  • a charm
  • wax cotton cord, about a 3/4 of a yard
  • studs
  • gold beads (I used square ones)
  • E6000 glue
  • pliers
Step 1: Make a macrame bracelet to fit around your write. For the tutorial refer to DIY Project #6. 


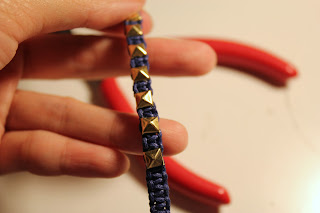
Step 2: Once you finish your bracelet, snip the excess off the ends and dab some glue to keep it in place. To stud, you'll need pliers. A stud has four prongs on its back. In order to attach it to any surface, you simply push the stud through a hole, and use pliers to push the prongs down to hold the stud in place. I studded the whole bracelet, leaving about half a finger's length in between each one. 


Step 3: To make your bracelet adjustable, take both ends and overlap. Take another piece of cord (about a hand's length) and knot (macrame style) over the ends. Finish the ends by adding beads and knotting the beads in place. 


Step 4: Add your charm by opening the lobster clasp and attaching it to your bracelet where ever you want. I'll probably be making more versions of bracelets with the other charms. That's a future project. 


Bam! Done. 
DIY PROJECT #7: THE NEON STATEMENT NECKLACE


One of the most popular colour trends of the season (especially for accessories) has surprisingly been the ever so vibrant neon yellow. At first I was skeptical about the bold colour but I started to fall in love with it when I kept seeing it paired with neutral colour palettes in accessories. 

There are a lot of DIY tutorials out there for DIY-ing your very own neon jewelry, inspired by Tom Binns. Those tutorials are great, as they are thrifty and nifty. Usually they call for a rhinestone necklace (easily purchased at any Forever 21 store for under 10 dollars) and some neon nail polish (which you use to selectively paint the rhinestones on your necklace. But my doubt with using nail polish was the difficulty of keeping it clean within the lines of the stones, and I was worried about it scratching off or looking opaque. I wanted to keep the sparkle in my necklace.

So when I saw these awesome neon crystal beads at my local bead store (6 bucks for a strand - buy one get one free deal), I knew I could finally make my own neon statement necklace. 

For this amazingly fun project you will need:


  • neon crystal beads (12 small, 8 large)
  • 10 beige crystal beads
  • 12 white seed beads
  • 4 gold beads
  • gold chain (about half a yard long)
  • two jump rings
  • a toggle clasp
  • pliers
  • E6000 glue
  • fishing line or stretchy cord
  • 5 rhinestone spacers
  • 30 minutes of your time
Step 1: Loop your fishing line through a gold bead, tie it securely. Then string your line through the first hole of your rhinestone spacer. 

Step 2: String 6 white seed beads. Then string on your second rhinestone spacer. After doing that, you want to string 6 small neon beads, then another spacer. Then another six small neon beads, then another spacer. After this fourth spacer, you then want to string on your last six white seed beads, and finish it with the last spacer. String a gold bead at the end of your spacer so that the bead holds everything in place. 

Step 3: For your second row of beads, you want to do the exact same thing as Step 2, except this time you are using 10 beige beads under your white seed beads, and 8 large neon beads under your smaller neon beads (See photo below for reference). Finish with a gold bead at the end of the spacer. Let the line hang as you'll want to use the line to attach to your chain. 

Step 4: Attach your gold chain to the line by double looping it through the gold bead. Cover the knot with E6000 glue for added security. 

Step 5: Using your pliers, open up your two jump rings. Thread your rings through your toggle clasp parts on either end. 

Five steps, and you're done. I didn't get as many visuals this time around for the process ( I got too excited and made the necklace too quickly thus forgetting to take pictures.) Let me know if you're confused by the instructions and I shall clarify. Have fun!


Saturday, June 23, 2012

DIY PROJECT #6: THE SUPER SPARKLY BRACELET


Beaded macrame bracelets are really common these days, and can be purchased at many stores. It's really easy to make, and requires just a few materials. I decided to make mine really flashy by adding rhinestone and a fancy button enclosure. But that's just me, I like flashy. You can easily make this type of bracelet more casual by opting out of using anything sparkly. This bracelet does take a little more time than some of the other projects that I've talked about. But the result is well worth the time!

To add a little sparkle to your life, you'll need:


  • wax cotton cord (1 yard) (any colour you like! I used a pastel green)
  • rhinestone chain
  • seed beads (any colour - flashy me chose gold)
  • a fancy button 
  • needle 
  • fishing line

Step 1: Cut two pieces of cord. One piece, about half an arm's length. The other piece, about an arm's length. Fold the first piece in half, creating a loop at the top. 


Step 2:Fold the other piece in half as well, and place it behind the first piece, perpendicular. 
  
Step 3: Slip a bead on the right side and then tie a knot OVER the bottom piece. Repeat for the other side and continue this pattern. 

Step 4: When you finish this pattern, secure a button at the end. On the other end, fashion a loop out of the cord. I chose to put beads over the loop, you can too if you want!

Step 5: When you have finished making your button clasp, take your needle and fishing line and sew the rhinestone onto your bracelet.
It should look like the picture to your left once you've got your groove going.


This is a project that will probably take you an hour or so for your first time making it. After the trial run, it should be easy peasy. 


It was a beautiful day in the city today, so I took to the streets to snap some shots of some DIY projects in action. Have a look-see!

 Above: DIY button earring. Below: DIY arrowhead necklace, DIY sparkly bracelet, and DIY button earrings.


DIY PROJECT #5: THE ARROWHEAD NECKLACE


I was browsing Courage My Love in Kensington Market one day, looking for vintage buttons when I happened upon a plate of these really cool arrowheads in the store. I thought it would be awesome on a long chain necklace. So I purchased the arrowhead (4 bucks - a little steep, but I really liked it) and bought some gold spray paint at my local Curry's Art store. The result:


 To do this project,  you'll need:
  • an arrowhead (if you live downtown, Toronto - you can find this in Kensington.)
  • a thin, long gold chain (3/4 of a yard)
  • gold spray paint
  • a jump ring
 This project didn't take long at all, and the steps are fairly simple.

Step 1: In a well-ventilated area, place your arrowhead on some scrap paper or newspaper. Hold your spray can at about half a foot away, and give your arrowhead one spray. Wait for it to dry. 

Step 2: Once one side is dry, flip it over and do the same thing on the other side. 

Step 3: Give your arrowhead two coats. Make sure to let it dry first before applying a coat. It is better to do several light coats rather than go spray crazy and try to do it all at once. 

Step 4: Thread your chain through the loop (if a loop isn't provided on your arrowhead, you can easily wrap some wire around it and make your own). Connect the chain with a jump ring. I didn't use a clasp because the necklace is long enough just to slip over your head.

And voila! 


Thursday, June 21, 2012

DIY PROJECT #4: THE INTERCHANGEABLE BALLET FLATS

Every woman has a pair of comfortable, plain ballet flats in their shoe collection. It is the go-to shoe for many outfits because it goes with just about anything - from leggings to jeans to summer dresses. And they're easy to wear (hell yeah to no laces or socks). But do you ever get bored of the plain-jane style? I do. So I set about trying to update my flats so that it would reflect changing trends. 

What you'll need:
  • velcro
  • ribbon
  • glue
  • sewing supplies: needle and thread
  • decorative button
Step 1: Start by cutting off whatever is on the surface of your flats. In my case, it was a bow. Make sure you are left with a smooth surface. Take one half of your velcro (measure it so it will fit on the top of your flats) and stick it on your shoe. The adhesive is quite strong, but if you're worried it might come off I recommend giving it a stitch or two with the ol' needle and thread to secure it in place. 


Step 2: Take your ribbon, folding one side inwards towards the middle. Secure in place with glue (you will stitch it later). Take the other side and bring it towards the middle, then fold it back. Essentially you're creating a double fold. 


Step 3: Take your button and glue it to the centre of the ribbon. Let dry. Take the second half of the velcro and stick it on the back of your ribbon. Place your ribbon over the velcro on your shoe. And there you have it!


The whole point of using velcro is so you can "interchange" whatever style you want. You can easily peel off your ribbon and replace it with something else if you get bored of your design. I'm thinking chain...rope...something with gems....beads..this is for the future, as at the moment I think I'll give this project a break and move onto something else. 

This took me twenty minutes. Now you get crackin'.

DIY PROJECT #3: The Multi-Purpose Accessory

I like the kind of accessory that I can make mindlessly while couch-potato-ing and watching my usual TV shows. That's exactly the kind of effort needed for this multi-purpose accessory:

It's a belt...

It's a necklace...


It's whatever you want it to be.

Pretty neat eh? And so easy. The key to the success of this project is the right materials and some helpful tips. 

Here's the low-down on materials needed:


  • chain (enough to wrap twice around your waist - I used 1.5 yards)
  • faux suede leather cord (I used white - great for the summer!)
  • a "hook and eye" buckle 
  • E6000 glue
  • pliers
  • two jump rings
I randomly found the great chain (which has a tinge of a silver finishing to it, and just the right shade of gold) in this hole-in-the-wall buttons and fabric store on Queen street. I wasn't even looking to make a belt. But by chance I stumbled upon some hook and eye buckles that seemed to be tossed aside in the store because they were so random and may have been the last of the stock. So I snatched them up for a buck each (heck yeah to my haggling skills). 

To ensure that this accessory is made smoothly and with ease, I hope you take some of my advice about the process in the steps below- sometimes I toss aside projects just 'cause it's time-consuming. You don't want that! I completed the project in 30 minutes while watching Master Chef. I LOVE Christine. What an amazing woman - kicking butt even when she's got such a disadvantage.
Step 1: Thread your suede cord through the chain following the steady motion of under-over, under-over. *Tip: The key to this being completed quickly is how you hold your chain while threading. You want to keep the chain TAUT so that you don't accidently thread the cord in through the wrong hole or through the wrong way. That just kills time because then you have to pull the chain out and it slows you down.
 
So use your index and middle fingers of your left hand like chopsticks to pull the chain upwards, and your ring finger and thumb to pinch and pull the chain downwards. This will give you great control. Use your right hand to thread. 


Step 2: Once you're done threading, glue the ends of the cord down and snip away the excess. 

Step 3: Take your pliers and open up two jump rings. Hook the jump rings through the loops on either end of your buckles. Close the rings around the ends of the chains and then use your pliers to close them up again. All done.


What?! Three steps? That's right.

Wednesday, June 20, 2012


DIY PROJECT #1: The 5 Minute Up-Cycle Necklace

Do you have a necklace in your jewelry collection that you have never worn because it's not entirely your style, but you keep it around because it's pretty and/or has sentimental value? Well don't let it collect dust! With a little bit of creativity and know-how of jewelry trends, some crafty tools, and five minutes of your busy day, you can have an updated, "up-cycled" new necklace to call your very own DIY accomplishment. 


My ever adorable and thoughtful boyfriend recently came back from a bachelor trip to Mexico bearing souvenir gifts in hand. He knows that I love jewelry, and decided to try his hand at picking something out at the local Mexican market. Oh, and he also bought me a Mexican rug (that will also be DIY-ed into something else because I have no idea what to do with it). Bless his heart. The necklace he purchased was beautiful, and I appreciate everything that he buys for me. It had stunning beads in a deep charcoal colour that were cut into interesting geometric shapes. But something was off about it. First of all, the length of the necklace was a little strange (it sat just below my collar bone) and the beads on the strand around the neck were awkwardly small and somewhat flimsy. But I wanted to wear it! So with a little bit of thought, a pair of scissors, and some rose-gold chain, I turned it into something that I absolutely love and will undoubtedly wear quite often from now on. 


Here's what you need:

  • a pair of scissors
  • some gold chain (I used rose gold - about half a yard, enough so that the necklace sits comfortably below my chest)
  • E600 glue
  • a toothpick
  • a necklace you want to up-cycle
Step 1: Carefully take apart your necklace. Since I used a beaded necklace, I had to be careful not to spill all the beads everywhere as I cut it open. 

Step 2: I discovered that it was fishing line underneath, which was perfect because all that was required was to tie the ends of the line to the chain. Now here's a helpful tip when connecting fishing line to chain - string the line through the chain first, then double it back through the last bead to ensure the knot does not come undone. Make it a double knot. 

Step 3: Using a toothpick with some E6000 on the end, carefully cover the knot with some glue. This will prevent any disastrous event of your necklace breaking. Trust me, this stuff is strong!      

Above: The original version to the left. The DIY version to the right. 
Now you may be wondering: where do I get those materials? The necklace you find in your own collection. The chain and glue, you can find at any local craft or bead store. In the Toronto area, my favourite haunts are on Queen West. When searching for chain to complete a project like this, make sure you choose one that is good quality. If it looks too yellow, it will look cheap. Try to go for a more delicate, thinner chain for a longer necklace like this. You don't want to look like Mr. T.


5 minutes? What are you waiting for? Get your DIY on!

DIY PROJECT #2: The 5-Minute Button Earrings

Buttons are great for crafts. They are so versatile because you can use them for a multitude of different crafts! I like to use them for DIY jewelry projects since a lot of the buttons you find these days are decorative and ornate. In the past, I've made friendship bracelets for my friends - they make great gifts!

 Above: Friendship bracelets I made for Christmas last year. Arm party galore!
One of the easiest things  you can do with buttons is to make adorable stud earrings out of them. I was at the button store the other day and found these beautifully crafted buttons that had a very vintage feel. 


To make stud earrings out of these buttons, you need just a few materials for a thrifty price (I paid less than five dollars for the buttons), and five minutes of your time.

Here's what you'll need:
  • buttons
  • earring backs (you can find this at your local craft or bead store)
  • E6000 glue (or a hot glue gun)
  • wire cutters
Step 1: Take your wire cutters and carefully cut off the shank on the back of the button. A shank is the little loopy thing at the back. If it's a plastic shank, you'll have no problem cutting it off. If it's a metal or glass shank, take a little more care while cutting them as they may shatter or fly off into your eye. If you're reckless like me, you won't wear eye protection. But if you're worried, throw on a pair of protective glasses.

Step 2: Make sure the surface on the back of your button is smooth. Any raised bumps or leftovers from the shank should be filed down until smooth. For my buttons, I didn't need to do any filing, but sometimes you can be left with residual shank. You can use a diamond file for that task. 

Step 3: Dab some E6000 in the centre of your button (or use a glue gun). If you're using E6000, let the glue dry overnight first before you start wearing your earrings. Place the earring back onto the button, then press and hold.  


That's it! Nothing to it.

Tuesday, June 19, 2012

DIY INSPIRATION: VINTAGE EDITION

The Never-Ending Search for Treasure


Everyone has their own idea of what is considered treasure. Some prefer the expensive variety of diamonds and gold, but to me, it has always been vintage jewelry. If you put me in an antique store, don't expect me to leave it within an hour, or even two. I'm probably happiest when I'm left to my own devices for a day in order to prowl through the jewelry stands, the glass cases with hidden gems, and the baskets filled with sparkly goodies. What's the appeal? 

1. They just don't make them like they used to. Have you ever picked up a vintage necklace in one hand, and a generic store-bought necklace in the other hand? Well if you have, I'm sure the first thing you notice is the incredible difference in craftsmanship. The weight, the intricate details, the design - you really can't find 'em made like they used to. I'm particularly partial to the statement costume pieces - necklaces are my favourite!

2. Every piece is unique. I can honestly say that as I go about my daily life, not once have I ever spied one of my vintage pieces on any other neck, wrist, finger, or ear lobe of any other person. Oh, and trust me - I observe. What can I say, I enjoy people-watching. And my tireless people-watching ways have taught me that no one, not a single person out there (so far), has what I have.  

3. Every piece has character and a story to share. Whenever I pick up a new necklace from the bottom of a dusty basket, or slide a bracelet off its display, I can't help but wonder. Wonder about its previous owner (or owners) and about its journey to the antique store where it eventually ends up in my own collection. Of course, my over imaginative mind likes to fabricate stories of grandeur. "This necklace could have graced the neck of a royal princess. Or maybe this ring was given by a soldier to his fiance." No? Probably not. But once in awhile I get a lovely story from the lovely people selling the jewelry, and I learn a little piece of history. 

4. The price is right. 5 bucks for a pair of earrings? 8 buckaroos for a bracelet? 10 whole dollars for a necklace? Sign. Me. Up. I'm not kidding. These prices are of course not the standard. But in general, I have been able to stay within that price range for a lot of the pieces in my collection. The most I've paid so far is 30 dollars. I tend to fall for the Monet statement necklaces, and those usually go for a little more. But come on, 30 bucks? I'm sure no one will have a nose bleed forking over 30 dollars for something that is truly a treasure. Maybe when we get to the high-roller stuff (you know, the sparklers locked up in display cases with thousand dollar price tags), maybe then tissue is necessary to wipe away your disbelief. Until the day you are a millionaire and can afford extravagant vintage pieces, just stick with what you can afford. 

Remember, vintage pieces are keepers. I hope one day I can pass down my collection to the people I love and perhaps inspire a new generation to continue the search for the ultimate form of treasure - vintage jewelry. 

Above: Wearing vintage jewelry - necklace, bracelet, and cocktail ring.